Back in the olden days of my youth, the only January birthdays in my family were myself and my younger brother (as opposed to my young-est brother) Yep, I am the oldest of the three, and as of Tuesday last week, I just got older. (sigh)
We grew up, eventually, and my youngest brother (as opposed to young-er) married a January "baby". Cool, one more January birthday in the middle of winter... Then my younger brother (as opposed to young-est) had 2 kids, BOTH of which were born in January. So now, all of the sudden, we are celebrating birthdays from the ides of January onwards, being the 13, 18, 24, 25, 29.
But we have trimmed down on the Birthday cakes a little. I had brownies, my younger brother wants Cherry Pie and my sister in-law wants Rolo-cookies. LOL But there is still one nephew left, and this was his cake.
Normally he's a chocolate and cherries kind of kid. So I assumed that he was going to ask for a Black Forest Cake, like last year (The same as his older brother had in October). But he surprised me by asking for a Chocolate and Mint cake (Evidently he has developed a taste for York Peppermint Patties) So this is what I came up with, sort of a York Peppermint Patti in reverse, using the same "base cake" that I use for the Fleur de Sel Caramel cake that I found in the Bon Appètit magazine a couple years ago.
 2 cups (14 oz) Granulated Sugar
1 3/4 (8.5 oz) cups AP Flour
3/4 (2.5 oz) cup Natural Cocoa Powder
1 1/2 tsp Aluminum Free Baking Powder
1 1/2 tsp Baking Soda
1 tsp Kosher Salt
2 large Eggs
8 TB Unsalted Butter, melted
1 cup Hot Water
1 TB Espresso Powder
1 cup Whole Milk
1 tsp Vanilla Extract
Mint Italian Buttercrème
Mint Chocolate Buttercrème filling
1 box After 8 Mints
15-20 Hershey's Kisses (Milk Chocolate or Caramel filled)
15-20 Hershey's Kisses (White Chocolate ones)
The best way to go about this cake is to have everything in the ready, cause it all comes together REALLY quickly in the mixer, SO...... Preheat the oven to 350 degrees.
Butter the bottom only, of two 9-inch square cake pans, line bottoms with parchment paper then Butter and Flour the parchment; set aside.
 So, sift Sugar, Flour, Cocoa Powder, Baking Powder, Baking Soda, and Salt into the bowl of your mixer.
 Whisk the Eggs.
 Melt the Butter.
 Mix the Espresso Powder and Hot Water together.
 And measure out the Milk and add the Vanilla...
 OK, Your ready to go. Let's Make Cake!
Start the mixer on Low speed (so you don't have a flour bomb going off in your face)
 Add the milk first.
 Then, once everything is nice and damp, add the beaten eggs.
 Once the eggs have been incorporated, add the melted butter mixing until just blended.
 Increase the speed to medium and beat for 2 minutes; until it becomes slightly "fluffy" looking.
 Lower the speed of the mixer and add the espresso/Hot water;
 beating until blended (the batter will be really thin).
 Divide the batter between the pans (about 3 1/4 cups in each pan).
 Bake cakes until tester inserted into center comes out clean, 30 - 35 minutes.
 Cool cakes on a rack for 10 minutes, then cut around cakes with a knife or offset spatula and turn out onto racks, peeling off parchment to cool them completely.
 Then wrap in plastic wrap and store in the refrigerator while you make Italian Buttercrème.
NOW it's time to assemble.....
Schmear a dollop of the buttercreme on a cake board.
 Lay down the first layer and top with the Chocolate/Mint Buttercrème filling.
 Place the second layer on top.
 Then apply a thin crumb coat of the mint buttercrème to the entire cake.
 Chill for 1 hour to set the buttercrème (cover the remaining buttercrème with plastic wrap and leave at room temperature) before applying the final coat.
 Spread the final layer of buttercrème over the cake, making sure the top is nice and flat.
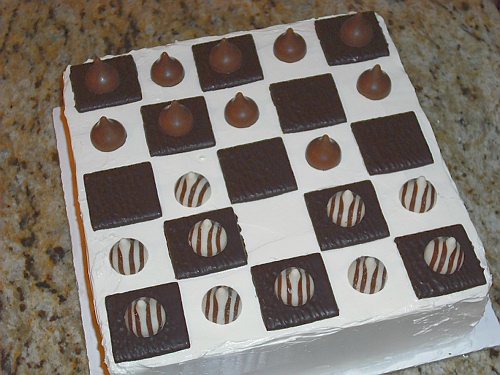
 Lay down the mints to form a Checker board pattern.
 I am gonna take a moment here and talk about mints.
I figured that the Giradelli mints would work just fine.
 I know they have the stamp on the one side, so I figured I would just flip them over.
 Well, I guess not.
 That is why I decided on After 8 Mints.
 Once you have placed your mints, simply apply a the Kisses/Hugs in a chess or checker set up. (white on one side, and milk on the other)
 And there you have it. Any one fore a game of Chess?
Mangia!!
~~
We grew up, eventually, and my youngest brother (as opposed to young-er) married a January "baby". Cool, one more January birthday in the middle of winter... Then my younger brother (as opposed to young-est) had 2 kids, BOTH of which were born in January. So now, all of the sudden, we are celebrating birthdays from the ides of January onwards, being the 13, 18, 24, 25, 29.
But we have trimmed down on the Birthday cakes a little. I had brownies, my younger brother wants Cherry Pie and my sister in-law wants Rolo-cookies. LOL But there is still one nephew left, and this was his cake.
Normally he's a chocolate and cherries kind of kid. So I assumed that he was going to ask for a Black Forest Cake, like last year (The same as his older brother had in October). But he surprised me by asking for a Chocolate and Mint cake (Evidently he has developed a taste for York Peppermint Patties) So this is what I came up with, sort of a York Peppermint Patti in reverse, using the same "base cake" that I use for the Fleur de Sel Caramel cake that I found in the Bon Appètit magazine a couple years ago.
Chocolate Mint Checker Board Cake
1 3/4 (8.5 oz) cups AP Flour
3/4 (2.5 oz) cup Natural Cocoa Powder
1 1/2 tsp Aluminum Free Baking Powder
1 1/2 tsp Baking Soda
1 tsp Kosher Salt
2 large Eggs
8 TB Unsalted Butter, melted
1 cup Hot Water
1 TB Espresso Powder
1 cup Whole Milk
1 tsp Vanilla Extract
Mint Italian Buttercrème
Mint Chocolate Buttercrème filling
1 box After 8 Mints
15-20 Hershey's Kisses (Milk Chocolate or Caramel filled)
15-20 Hershey's Kisses (White Chocolate ones)
The best way to go about this cake is to have everything in the ready, cause it all comes together REALLY quickly in the mixer, SO...... Preheat the oven to 350 degrees.
Butter the bottom only, of two 9-inch square cake pans, line bottoms with parchment paper then Butter and Flour the parchment; set aside.


Start the mixer on Low speed (so you don't have a flour bomb going off in your face)


NOW it's time to assemble.....
Schmear a dollop of the buttercreme on a cake board.


I figured that the Giradelli mints would work just fine.


Mangia!!
~~
No comments:
Post a Comment